Does this mean that Molly Duggan is dropping Drupal? Absolutely not. Drupal is hands down the best Enterprise CMS and it will always be the bee’s knees.
For those of you who are on the fence or thinking about moving to WordPress, this article isn’t for you. This is more of a how-to article. If you’re curious if WordPress is for you, we have a resource for that.
If you’re curious or want to know step-by-step how difficult it is to migrate from Drupal 7 to WordPress, this article is for you. In fact, we’ll go deeper and even create a multisite Drupal website so we can support subdomains.
Since 2015, mollyduggan.com has been using sub-domains to distinguish its different offerings and provide better SEO and stickiness from advertisements. Since we’re moving mollyduggan.com to WordPress, we definitely don’t want to lose the current site which we’ve spent 5+ years building.

In this article, we’ll be covering migrating from Drupal 7 to WordPress, multisite setup on Pantheon, and applying the current design to the new site using Elementor.
Getting started (with Terminus)
First, we’ll assume that you have some basic knowledge of the command line and you’ve installed Pantheon’s Terminus CLI. If you don’t have Terminus installed and you don’t feel comfortable with the command line, skip this section and move on to installing WordPress with Pantheon.
Let’s create our new site using Terminus.
Example: $ terminus site:create --org ORG --region REGION -- <site_name> <label> <upstream_id>
Actual: $ terminus site:create --org=”Molly Duggan Associates” --region=”United States” -- mda2021 “MDA 2021 wordpress
Installing WordPress with Pantheon
If you don’t have an account on Pantheon, create one now or log in to Pantheon’s dashboard. Create a new site using the UI and choose your preferred region and finally choose WordPress. That was easy!
Setup Multisite
Before you get started with multisite, you need to know that there are supported and unsupported use cases. Definitely review them. For mollyduggan.com, our use case is supported and one of the perfect reasons to do this.
Let’s jump to the command line to enable multisite or install WordPress Site Network for our new site. I’ll condense the instructions here to keep us moving along (Get the extended version here).
If you’re not interested in multisite and you just want to migrate from Drupal to WordPress, skip to the next section, Setting up WordPress.
-
Make sure your site is set to SFTP using Terminus or the Dashboard UI. If you just created the site, the default settings should be SFTP.
Actual: $ terminus connection:set mda2021.dev sftp
Example: $ terminus connection:set <site>.dev sftp -
We have to use Terminus to execute the multisite command. Sorry, if you’re not using your command line.
Actual: $ terminus wp mda2021.dev -- core multisite-install --url=dev-mda2021.pantheonsite.io --title=”Molly Duggan Agency” --admin_user=”My Name” --admin_email=my-email@address.com
Example: $ terminus wp <site>.<env> -- core multisite-install --url=<url> --title=<site-title> --admin_user=<username> --admin_email=<email>Terminus should have given you a password. Save it somewhere.
-
Also, Terminus added wp multisite constants to your wp-config.php file. You’ll want to commit that file at the dashboard with a commit message like “I just added multisite functionality and it rocks!”.
-
Switch your site back to GIT mode for the next steps.
-
Let’s get the code from Pantheon so we can follow the next steps. If you haven’t done this before on Pantheon, see Get the Code.
-
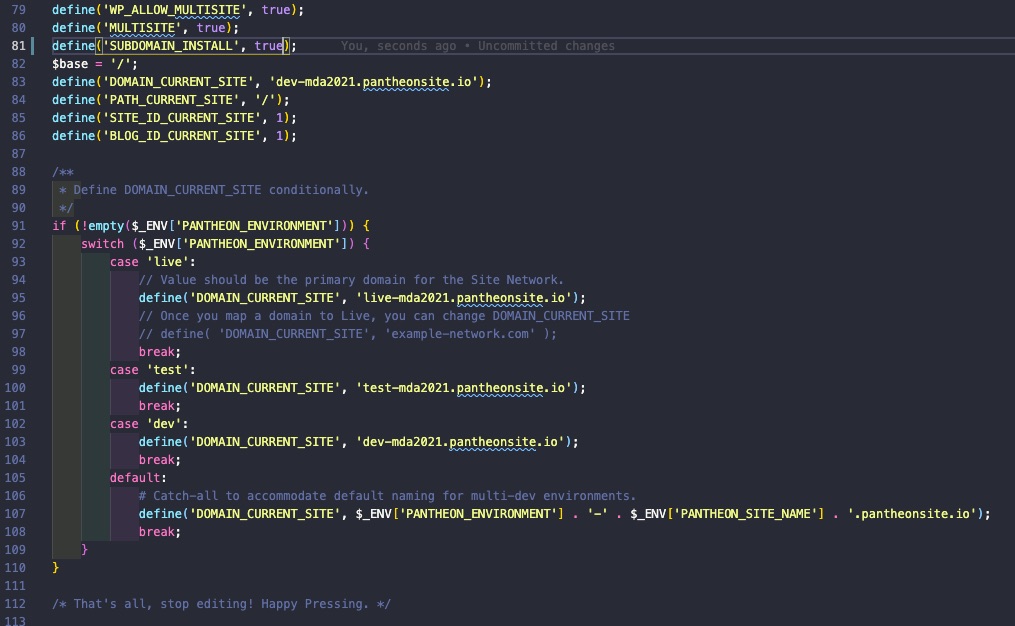
Open ~/wp-config.php and you’ll notice some new lines. Be sure to comment out line "define('DOMAIN_CURRENT_SITE', 'dev-mda2021.pantheonsite.io');".
define('WP_ALLOW_MULTISITE', true); define('MULTISITE', true); define('SUBDOMAIN_INSTALL', false); $base = '/'; # define('DOMAIN_CURRENT_SITE', 'dev-mda2021.pantheonsite.io'); define('PATH_CURRENT_SITE', '/'); define('SITE_ID_CURRENT_SITE', 1); define('BLOG_ID_CURRENT_SITE', 1); -
Now add this block of code below the entry above. Notice line 81 is set to true to allow subdomain installation.
/**
* Define DOMAIN_CURRENT_SITE conditionally.
*/
if ( ! empty( $_ENV['PANTHEON_ENVIRONMENT'] ) ) {
  switch( $_ENV['PANTHEON_ENVIRONMENT'] ) {
    case 'live':
      // Value should be the primary domain for the Site Network.
      define( 'DOMAIN_CURRENT_SITE', 'live-<site>.pantheonsite.io' );
      // Once you map a domain to Live, you can change DOMAIN_CURRENT_SITE
      // define( 'DOMAIN_CURRENT_SITE', 'example-network.com' );
      break;
    case 'test':
      define( 'DOMAIN_CURRENT_SITE', 'test-<site>.pantheonsite.io' );
      break;
    case 'dev':
      define( 'DOMAIN_CURRENT_SITE', 'dev-<site>.pantheonsite.io' );
      break;
    default:
      # Catch-all to accommodate default naming for multi-dev environments.
      define( 'DOMAIN_CURRENT_SITE', $_ENV['PANTHEON_ENVIRONMENT'] . '-' . $_ENV['PANTHEON_SITE_NAME'] . '.pantheonsite.io' );
      break;
    }
}
It should look like this.
-
Save this file and push it back to Pantheon using Git.
Map Custom Hostnames for WordPress
In order for your DEV site to work properly when you try visiting subdomains, you’ll need to make some DNS settings. For our site, we added a CNAME from dev.mollyduggan.com to our new site on Pantheon. See additional instructions here.
Using Terminus, add your DEV subdomain.
Example: $ terminus domain:add <site>.dev dev.example.com
Actual: $ terminus domain:add mda2021.dev dev.mollyduggan.com
Oops! If you’re doing this on a new site with Pantheon, you’ll need to convert to a paid site from your sandbox as Pantheon allows zero (0) domains to be added on sandbox accounts. Also, you’ll need to have Pantheon turn on the Multisite feature, otherwise, you’ll be spinning your wheels wondering why your domains aren’t working. Talk to us about saving some $$$ on your hosting fees and speeding up the migration process.

Go back to wp-config.php and edit the DEV and LIVE urls “DOMAIN_CURRENT_SITE”.
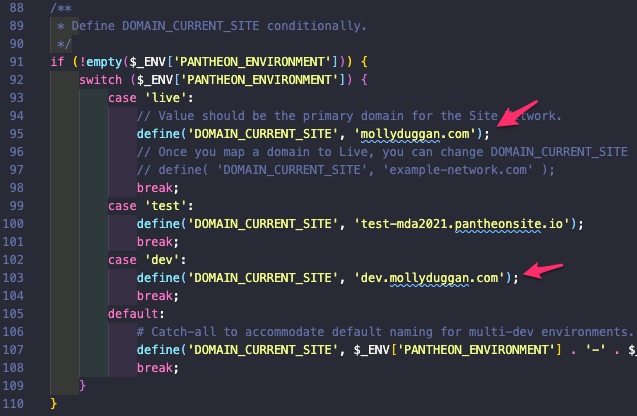
MollyDuggan.com has 7 subdomains. This means that we’ll need to create and map 7 different subdomain sites on WordPress and our DNS provider just to see and work with them in a DEV environment. We’ll need to do this in the TEST and LIVE environment when we move to those environments too. It sounds like a lot, but it’s actually not.
Setting up WordPress
Now that we have WordPress installed on Pantheon and multisite setup (not required for everyone), let’s get started by logging in to our site using your email and password you received during manual installation through the Pantheon dashboard or when adding the multisite setup above.
The first thing we need to do is put our site in SFTP mode so that we can quickly search and install Elementor and other plugins to support our various needs such as SEO. This article won’t go into other plugins. Go to your site's dashboard on Pantheon and switch from GIT to SFTP mode.

Go back to your new website and assuming you're logged in to your new WordPress site, click on plugins in the left sidebar navigation. If you’ve never updated a plugin on Pantheon, this is a good opportunity to test it out. Click “update now” next to one of the plugins in the list. Once it’s complete, go back to your Pantheon dashboard tab that’s showing your website and you’ll notice that there’s a code commit waiting for you to commit it. Add a message like “updated hello dolly plugin” and click commit. We’ll follow similar steps to add Elementor next. (Learn more about installing plugins on Pantheon)
Install Elementor
If you’re installing Elementor on a multisite, you’ll need to go to the Network Admin and then click on Plugins (~/wp-admin/network/plugins.php). For non-multisite sites, visit ~/wp-admin/plugins.php to install new plugins. Be sure your site is in SFTP mode and once you’re done installing plugins like Elementor, be sure to commit the code from the Pantheon dashboard.
Important! Save yourself some time and add the following to your wp-config.php file (More info about FS_METHOD) and commit it now.
if (isset($_ENV['PANTHEON_ENVIRONMENT'])) {
    define('FS_METHOD', 'direct');
}
Preserve Organic Rankings
Permalinks or URL structures
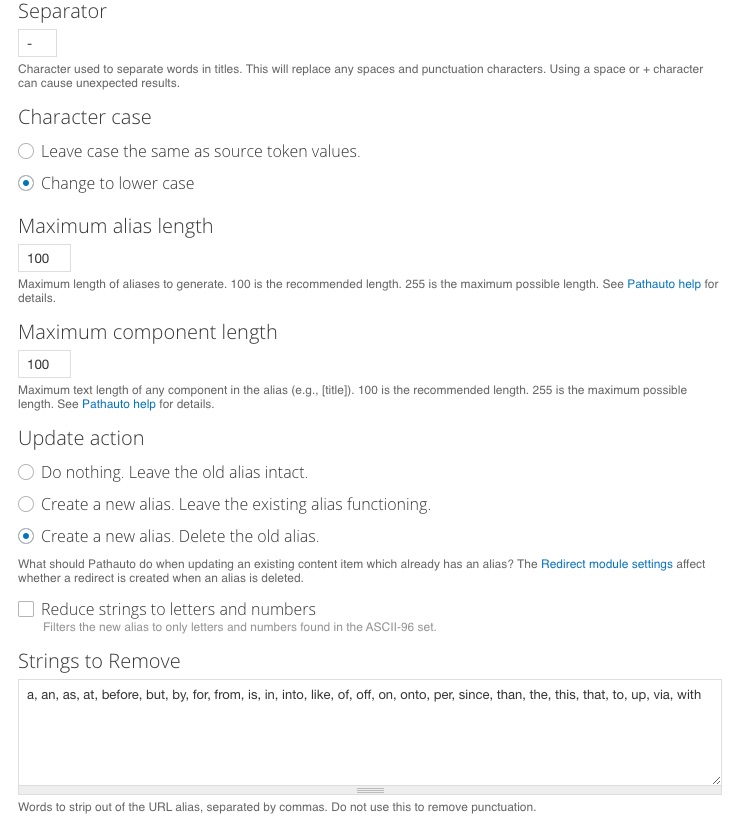
In WordPress, URL structure or aliases (Drupal) are not baked in. There are two camps. Camp 1 says, “I want shorter cleaner URLs”. Camp 2 says, “I want human-readable URLs”. Neither camp is wrong. However, this section is about preserving organic rankings. This means, don’t sweat it at this time. After you migrate your content, you can always use Yoast to configure whether you want to clean up your permalinks by removing stopwords such as “a, an, as, is, and in”. Let’s move on.
Applying your theme and migrating content
Applying your theme
Applying your theme with Elementor can be a fun process. I highly recommend creating reusable templates. There are a plethora of videos to show you how to do this and it will make updating your site easier in the future. This can take a day to many weeks to complete.
Migrating Content
For most sites, migrating your content may be fastest if you copy and paste from one site to another. This will give you a chance to format your content and adjust it for the different resolutions.
